While we have many nice granite cliffs in NZ most of them require a long approach and many do not have sustained climbing throughout. Being a bit lazy in terms of walking 6-10 hours for 300-500m of climbing I often found myself lacking inspiration as I searched through guide books and maps looking for a new climbing challenge. When it comes to rock climbing I love long climbs with short approaches, the walking to climbing ratio has to be climbing positive.
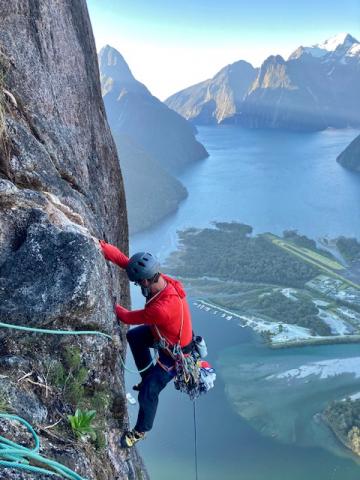
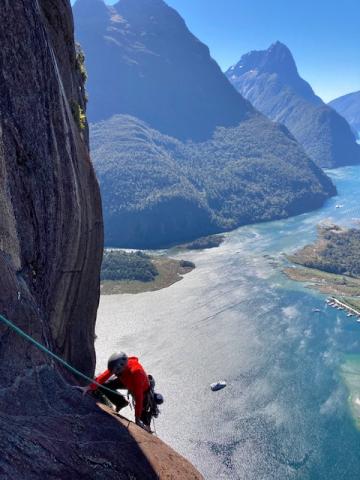
Steve Fortune on pitch 21 during the first one day free ascent of the Mile High Club. Nov 2020. Creator: Daniel Joll
Now.........Imagine El Capitan today if Warren Harding simply walked to the top and rap bolted the Nose?
I pose the question because in NZ its fairly easy to walk to the top and rap in on any alpine face. In doing so much of the exploration and excitment of a first ascent is lost. There is a lot to gain though by climbing ground up, especially on a rather large wall. We made a choice to establish this route ground up. Partly due to the challenge and in part for the practice. We also were keen to show that this is a good way to establish big new lines.
I had been lucky to have Merry in Queenstown this year. Like myself he has a love of ground up adventure climbing and had plenty of time to spare over the winter. He is also well versed in establishing and climbing big granite lines. Without a committed partner the Mile High Club would never have been established. We never discussed rapping in on the wall. We were on the hunt for a sunny winter granite wall to test ourselves against. Maybe if we knew just how much work Airport Wall was going to be we might have picked a different objective. However, who can complain about having a big wall climbing project with a short approach and pitch after pitch of untamed rock. Walls like the Airport Wall take a huge amount of work.
14 days simply to top out. Another 16 – 20 days to free the route and clean the pitches. An additional 10 days getting ready for sending the route in a day. All up over 40 days spent on the wall in the past three months! Around $4,000 - $5,000 of expenses were also sunk into the wall everything from bolts, brushes, fixed lines to petrol driving multiple times down to Milford. Ultimately, all worth it though, to have a long challenging line to push ourselves on.
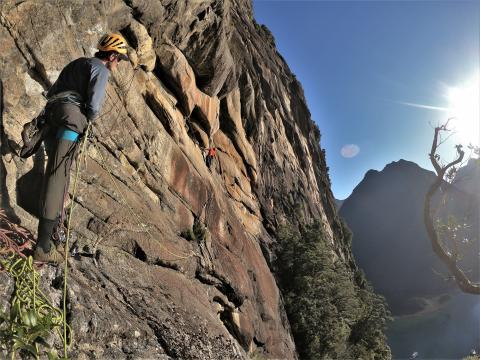
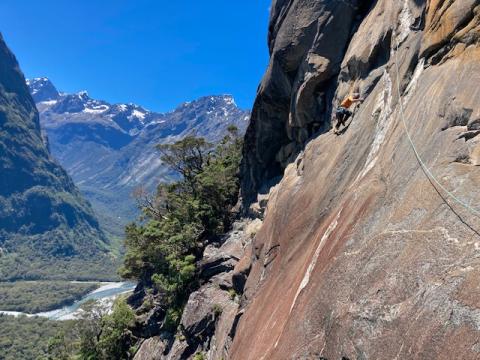
Daniel leading out from the Koru Club during the First Ascent Creator: Merry
The Airport Wall, rising out of Milford Sound is rather large by NZ standards. It has been admired and hypothesised over by many for decades. It is as close to a big wall climb as you’re going to get in NZ. Think of it as a large version of the Chief or Half Dome. In terms of difficulty for those who have climbed in Yosemite and wondering how this might compare it sits somewhere between the North West Face of Half Dome and Free Rider. Being a bit harder than Half Dome but easier than an El Capitan route like Free Rider.
Hanging in space 500m above Milford Sound on one of its many overhanging pitches I knew that this wall is something unique and special. It’s hard to put a name on the Airport wall from another country as it is a truly Kiwi experience. Sitting in the Koru Club (the second major bivy ledge) amongst lush native bush watching the sunset over Milford Sound has to rate as one of the all time best bivy locations I have experienced. On our first visit to this ledge we spent the Winter Solstice climbing in a tee shirt as sun radiated off the golden granite heating the wall to temperatures more akin to a days cragging in spring.
We were not the first to venture onto the Airport Wall. Around ten years before Bruce Dowick along with a collection of friends attempted to go ground up on the central corner line. This is a rather loose affair and after fixing lines 400m through the bush they bailed 40m up the first pitch of the corner due to some dangerous loose blocks. If you’re up on the wall you will spot their fixed line running into the central corner. This experience was in stark contrast to our time on the wall where we climbed on very solid rock. Later Bruce, Brian and Fiona returned and rapped the wall. Luckily for us that’s where the exploration stopped and for ten years the cliff lay waiting.
In New Zealand we have few mountains / walls that are actually difficult to reach the top off. Over the past 20 years the trend of top down route development, simply walking or taking a helicopter to the top of a wall, rapping down and putting the bolts in / cleaning on rappel is slowly emerging. While we all benefit from anyones efforts to establish new lines I do feel that the current trend means the skills required for safe ground up exploration are being lost or going undeveloped.
Ground up big wall climbing is an amazing task, it combines the skills of line choice, onsight climbing, fitness, aid climbing, motivation and gear management. I also believe it leaves a solid example for future generations of climbers to look for adventure rather than guaranteed success that comes from top down route development. Most of the argument for rap bolting is placed around safety and creating a consumer friendly route.
However, with a drill there is basically no obstacle that can not be safely navigated when going ground up. Belays can be safely located away from the lead climbers fall line, loose blocks can be hooked around using bat hook holes and later removed from the wall when the team has passed them. The reality is that ground up climbing is simply harder and slower than top down route development which causes many to shy away from it. Don’t get me wrong I put up plenty of top down rap bolted sport climbs. I just feel that when your in the mountains why not enjoy the challenge of going ground up when new routing.
Merry working pitch 22 Creator: Daniel Joll
If people can, lets leave the Airport Wall as a wall for ground up route development. Give future generations of Kiwi climbers something to train and aspire to. This is the winter multipitch rock climbing destination of NZ. I doubt there is a sunnier, bigger cliff in the country that has more possibility for future generations than the Airport Wall. Sections of this wall are immaculate other parts will take days of cleaning and hard work. No doubt who ever puts the next route up on this wall is going to have to work for it.
Merry and myself had many helpers join us over the 30 plus days we spent on The Mile High Club, in no particular order a big thanks to Alastair, Jaz, Rachael, Jessy, Jono, James, Anton, Sooji and Ruari who all put in hours / days of work helping to clean and climb pitches on the route. There are still sections of the climb that would benefit from a good wire brush. We would appreciate if future repeats help us finish the cleaning work by taking a wire brush and giving any mossy sections a tidy up.
Approach
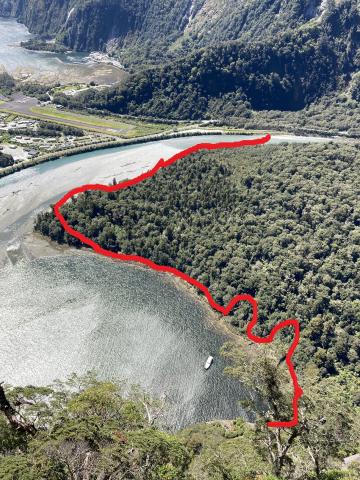
On Foot approx. 45 minutes – 1 hour from leaving car to starting climbing. Head into the big car park just down from Milford Lodge i.e take the next left after the lodge heading towards the boat ramp. The car park Is just on our left as you enter Deep Water Basin Rd. Go to the end of the car park closest to Milford Lodge and cross here. After crossing the river follow the true left bank out to the bay then follow the shore line round to the fixed lines and base of the route. Eventually you will pick up the approach track.
A jumar makes the fixed lines easier. If your worried about the condition of the fixed lines use your own rope. Over time they will deteriorate and need replacing. There are two small creeks that you need to go around depending on the tide level. They are easy to cross just head inland till the point you can step over while keeping your feet dry. Then head back towards the shore line.
Approach on foot Creator: Daniel Joll
By boat or kayak the approach time is more or less the same as walking when you factor in mucking around with your raft , boat or kayak. We usually take a small blow up boat and launch it at the boat ramp. We then stash it at the shore line and walk along the high tide mark. All up approx. 15 minute paddle, 20 minutes to fixed lines, 15 minutes to base of the route.
Fixed lines will deteriorate over time !!! use your own rope if you think they look dodgy.
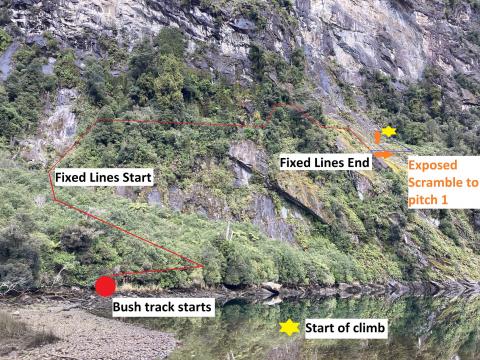
Fixed Lines Approach Creator: Daniel Joll
Pitch by pitch beta comes after the topos.
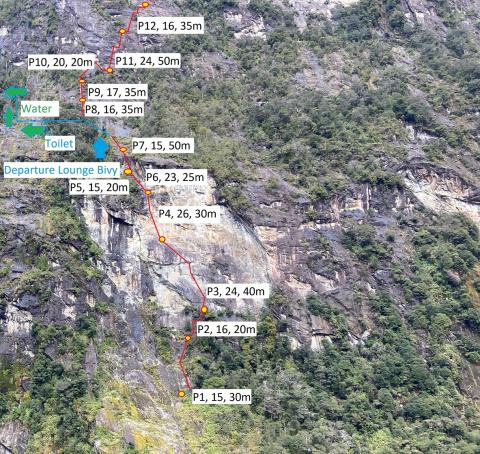
Lower wall topo Creator: Daniel Joll
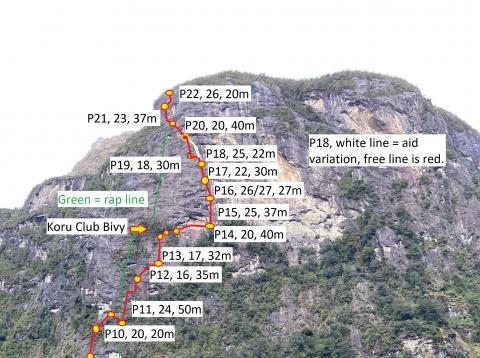
Upper Wall Topo Creator: Daniel Joll
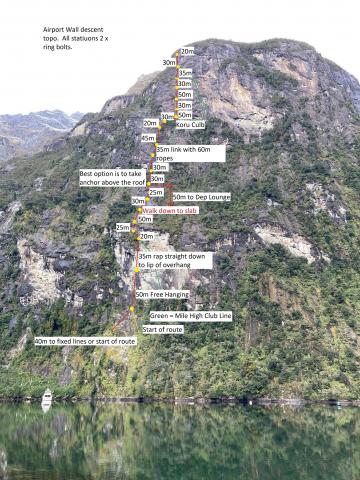
Descent topo Creator: Daniel Joll
Free Climbing Beta
Please help to clean the route. Have a good wire and soft bristle brush for your team. Use a nut pick to help clean the cracks. We have done the bulk of the work but this is a route that will need traffic and cleaning to become a classic. The north facing aspect and low elevation makes it a place where vegetation grows easily. When cleaning be careful not to remove any key foot or hand holds.
We would ask that each team takes a few hours on their way down to help clean one pitch. I.e pick a pitch and put some time and effort into helping clean it up. If you find a loose rock on the wall please consider anyone below you before you throw it off.
Free Climbing Rack
Double set of nuts 1 – 10 having one of these sets being off set nuts which are always useful on granite
Double set of cams .2 - #3 camalot single (green c3 size) single #4 Camalot.
A second #4 may be handy for teams aiding or climbers who are not solid on mid 20s trad pitches.
14 - 16 quick draws 6 x regular, 8 x 60cm, 2 x 120cm
Belay glasses (save your neck on the many overhanging pitches)
2 x anchor slings. All belays are double bolt. However if your hauling bring a proper set of anchor slings / cord. Have an independent master point for both climbers and haul bag. This will help you keep your anchors tidy and stop your haul bag trapping other gear at the belays. 3 x locking biners per anchor sling
A jummaring set up for each climber to allow them to jug fixed lines if your planning to fix pitches at the end of each day. If you plan to fix lines and jumar use thicker ropes. i.e 10 – 10.5mm static or dynamic. Granite edges are sharp and cut ropes quickly.
Hauling set up
Petzl pro traction or similar, 4 x locking oval caranibers, Jummar, 2 x regular pully’s if planning to haul a big bag using either a 2-1 or 3-1 style set up. Micro traction, swivel for the haul bag, knot protector for the haul bags tie in point
Ropes
If you climbing on a single rope make sure you bring plenty of extendable quick draws for the longer pitches. We always climbed on a single rope, this is manageable on all pitches if you plan where and when to use your extendable quick draws.
If your planning an ascent involving aid climbing then climb on a thick single rope so your second can jummer to clean the pitches. Make sure you take an edge protector to place on any sharp edge the rope might run over.
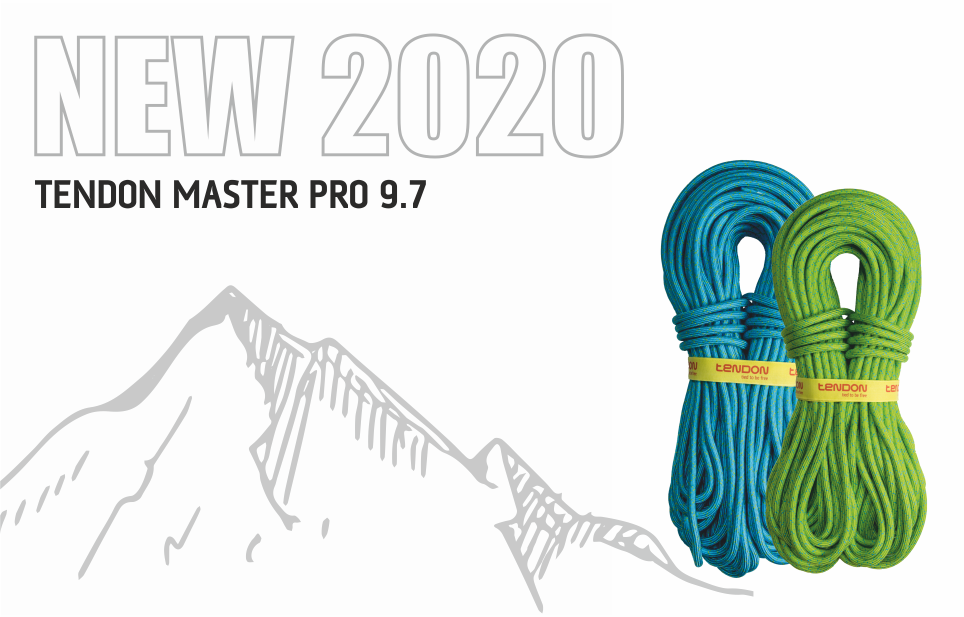
You can climb and descend the route with 2 x 60m ropes TENDON Master 7.8
10 – 20m lower out line for the haul bag. This is used to both dock the haul bag at the anchor and to lower it out on traversing pitches.
Shoes
A comfy pair of shoes you can wear socks in will save your ankles from any sand flies. A technical pair for the cruxes may also be handy. Between June – October we had no problems with Sandflys on the wall.
If you plan to aid the crux pitches then in addition to the rack above include 1 grappling hook (or sky hook will do) 2 x bat hooks ( 2 x talon hooks would also work) Clean aid only please we did not use pitons and they are not needed. Be careful not to destroy any holds needed for free climbing the route. Please avoid clipping hooks as protection which can result in you ripping hold off the wall should you fall and shock load the hook placement.
Steve topping out pitch 17 during the first one day free ascent Creator: Daniel Joll
Ascent strategy
The route can be climbed in a day as most routes can. However a realistic timeframe for most ascents will be 3 – 4 days. Our suggested plan of attack for those taking a multi day approach is below.
Water. Hauling water is heavy hard work. There is a good water source 10 minutes walk from the Departure Lounge bivy located between pitches 7-8. Follow the well cut track along the wall and through the bush until you hit the first stream. There are several. Fill up here for the next 2-3 days. Budget 4-5L of water per person per day.
Take poo bags and a poo tube for the upper wall. Please avoid pissing on the climbing line / holds and please don’t shit on the ledges on the wall or on the route. There is a good toilet location at the Departure Lounge ( walk along the wall and follow the signs) then pack your shit out from the upper wall.
There is a water drum at the Departure Lounge & Koru Club. If its full its bonus water but I wouldn’t count on it. Tip any excess water after your ascent into the drum to top it up when you leave. Don’t contaminate this by using it to wash hands etc.
At both the Departure Lounge and the Koru Club you can pitch a 2 person tent and in addition easily accommodate 2 – 3 extra people in bivy bags. A portaledge is not necessary if you plan to only camp at these bivy spot. If you feel you might need more time to ascend the route then bring a portaledge and give yourself a few more options. A bivy bag and sleeping bag rather than a tent will give you the most options of where to sleep. There is a good one person bivy at the base of pitch 19. This would be a spot to aim for if your taking a portaledge up the wall or making a solo ascent and planning to bivy above the Koru Club.
Make sure you study the topo well to see the different climbing, hauling and rapping lines.
There is a rat trap at the Koru Club and a jar of peanut butter to bait it. Over 10 rats caught and counting. Don’t leave the trap set when you leave the ledge or you might kill a native bird. Throw any dead rats off the wall.
We would appreciate if no additional fixed protection is added to this route please. The aiding is easy with a couple of hooks and the free climbing cruxes are safe and sometims exciting.
Day 1 – Arrival in Milford
Consider on the day you arrive to Milford crossing the river and taking your bags / gear 45m up the approach pitch ( pitch 1&2). Leave your haul bag here ready for starting the route the following day. You don’t need a full day for this just an afternoon, once done head back to Milford or bivy in the bush at the base of the route. If you Don’t have a kayak, boat, boggie board then look for a low point in the river and head on over to the wall ( see approach topo). The lowest spots to cross are near Milford lodge which makes for a longer approach.
From the small beach below and left of the wall, follow a well marked trail up to a fixed line traverse cross a bush ledge (5-30 minutes depending on the size of your pack). Follow fixed ropes on a right tending traverse. This finishes at a double ring belay. From here drop down 15m to a small ledge and a single bolt belay. Cross the small gully ( easy scrambling ) you may want a belay if carrying a haul bag and head up 30m to the double ring belay and the start of pitch 1.
If you have allot of gear it is probably faster and easier to simply make two trips over the fixed line trasverse.
You will spot the bolts from our original line of ascent out left through a big roof. This is an open project and a variation to pitch 3. It goes at around c2 on bat / sky hooks.
AID CLIMBERS – please protect the free climbing features, pockets and small edges etc. Don’t hook any delicate flakes or clip your sky hooks placed in pockets as protection. An early repeat of the lower wall by an aid climbing team almost caused a key pocket to be ruined when they clipped a sky hook as protection then fell causing it to rip out the edge of the pocket. Please don’t use pitons or place any extra protection bolts.
If your haul bag is light a fast team will easily reach the Koru Club in a day.
Day 2
Get an early start and head back up to the base of pitch 3. As you pass the old tree mid height of the pitch make sure you flick your haul line over to the left hand side of the tree to save your haul bag getting stuck in the tree. The tightly spaced bolts here are to ensure you don’t land on the tree should you fall off making the crux moves. At the top of the lower tier overhang you reach an easy 60m slab.
From here continue up to the Departure Lounge bivy ledge. Head along the track to the running water. Fill your water for the rest of the time on the wall here. Climb the next 3 pitches and fix ropes from the top of pitch 8 back down to the Departure Lounge 80m. A 60m rope allows you to fix back to a double bolt belay 30m above the Departure Lounge. This is an anchor for hauling and it is a nicer line to haul on compared to taking your bag up pitches 8-10.
There are big bins at the Departure Lounge for stashing gear and food. ( rats ! ) Please leave no rubbish or items here after your ascent and the lids on the bins.
There is a good toilet spot 2 minutes from camp. Follow the track along the base of the wall then follow the orange markers to the toilet located in a fallen tree trunk. Please don’t shit around the bivy.
Important – We left a re belay bolt on the lip of the big roof when you rap down from pitch 10. Re belay your rope here on the bolt to save if rubbing on the lip of the roof when jummaring back up the next morning.
If you arrive at the departure lounge but do not manage to arrive at the base of pitch 10 that night. Then simply haul your bag with you as you climb the next day. This will involve a small lower out of your haul bag on pitch 10. To do a haul bag lower have the leader head over to the belay at the base of pitch 11. Set the haul line for hauling. The second lowers the haul bag while the leader hauls it in until it is docked at the anchor.
Day 3
If you made it to the base of pitch 11 the day prior.
Jug your fixed lines and haul your bag up to the base of pitch 9. Note there is a hauling belay and a separate climbing belay just to the right which allows you to belay from a nicer ledge. Climb up to the Koru Club (best bivy on the route) pitches 11-13 then climb pitches 14-16 fixing your ropes back to the Koru Club. This will be the end of the hauling for most teams. Note when fixing from the Koru Club across the golden traverse make sure you attach your static rope to the anchor or it will be very hard to get back up to the bivy when you come down!
You can also fix from the top of pitch 14-16 back to the Koru Club if you make it that far on day 3 using 2- ropes and a re belay. This makes for a wild free hanging jumar the next morning. There are bolted anchors which will allow you to fix your ropes on this section of the wall. When rapping down from the top of pitch 14, 15 or 16 look for the ledge system that runs across the roof of the cave ( half way up pitch 14 on the climber left).
There are two single bolts for fixing too and to help you traverse across this ledge system. At the second of these bolts you drop down 5m to a double bolt belay. From here a 30m free hanging rap takes you back into the Koru Club. ( it helps to place some gear in the crack just below the belay to avoid you hanging to far out in space ) *see descent topo for detailed info* Place edge protectors on this line if your planning to jug back up the next morning.
Please keep the Koru Club clean! No rubbish, pack out your shit. Bait the rat trap and help save some the birds who live here. We caught 6 rats on our second stay at this ledge. A big plastic rubbish bin is there for stashing food and gear so the rats can’t get it.
Don’t leave your rubbish in it !
Steve Fortune leaving Koru Club during the first one day free ascent Creator: Daniel Joll
Day 4
Jug your ropes and blast to the top. From the top of the route you can follow the rap line straight back to the Koru Club. This rap line follows the alternate line of the “Hijacking” We are still working on this line so please treat it as a closed project for now.
From the top. Keep on rapping down taking all your rubbish with you and either walk our via the Departure Lounge trail ( 3 -4 hours ) or continue rapping right down to the base of the route and then enjoy the 10 minute stroll to Milford. ( preferred descent )
The wall faces North and dries quickly after rain. That being said if your planning to free all the pitches you might have to wait 24-48 hours to ensure everything is dry. The upper half of the route dries the fastest. Ie from the Koru Club to the top. Pitches 3&4 are basically perma dry.
Air Miles. Not on sighting grade 26-27? Then its likely you may make the odd deposit in your air miles account. Don’t worry though. Cruxes are steep and falls are clean. Unlike several recent Darrens routes you won’t find dogging bolts to help you get through crux sections. There is allot of mandatory free climbing. Bring some aid gear if you are not solid on terrain up to grade 24-25. All cruxes can be easily aided at around c2 using a combination of bat hooks, sky hooks and a grappling hook.
In general, the climbing is not so run out, however if you find yourself legs shaking above your gear spare a thought for how we felt on the first ascent with moss covered rock and no idea what was coming ahead. Like any big wall route, consider your experience and ability before embarking. From the traverse out of the Koru Club the route gets more committing and is fairly sustained. Pitches 15 – 20 before you re gain the rap line are the hardest pitches to bail from.
Aid Climbers may wish to include a second #4 Camalot in their rack.
2 day plan
If your fit and moving well taking one day to reach Koru Club then another to the top of the route is a good plan. There is of course the challenge of the one day free ascent to try for as well ! The first one day free ascent was completed by Daniel Joll and Steve Fortune in November 2020 taking 16.5 hours. This included a lunch break for 45m at Koru and 3.5 hours (many tries) to send the final pitch. A team moving well should expect to spend anywhere from 12 - 24 hours on a one day free ascent.
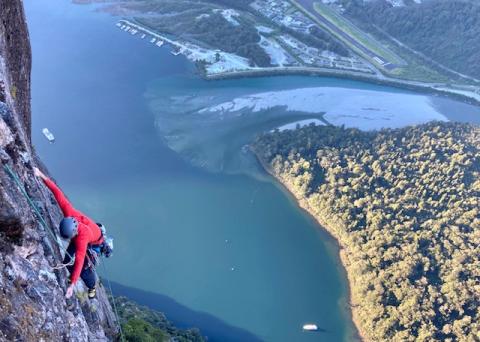
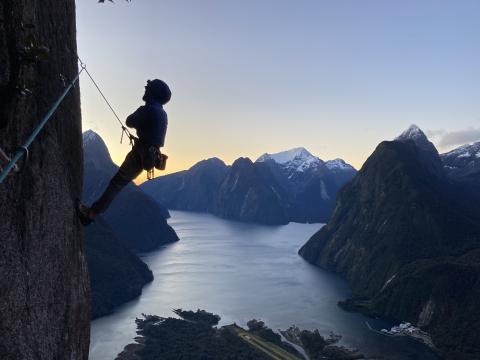
Steve Fortune on pitch 21 during the first one day free ascent Creator: Daniel Joll
Descent
Reverse the last two pitches. You don’t go to the climbing anchor on pitch 20 , there is a set of rings appox 10m climbers left at the same height. Then head straight down into the Koru Club. In this section you are following a new route (closed project) with several other anchors in place for the various pitches. Most raps are approx. 30-50m long.
At the Koru Club head to the far side of the ledge ( climbers left) A short 25m absail takes you down and left ( Climbers Left to a set of rings on the face, you make a slight traverse to locate them) from those rings make 3 more raps to the rings at the end of the Turbalance down climb. Continue straight down 3 more raps to the Departure Lounge.
From the Departure Lounge rap down the route until your on top of pitch 4 (26) rather than rapping the last 4 pitches which involves some traversing continue straight down via double ring anchors to the end of the fixed lines / base of the route.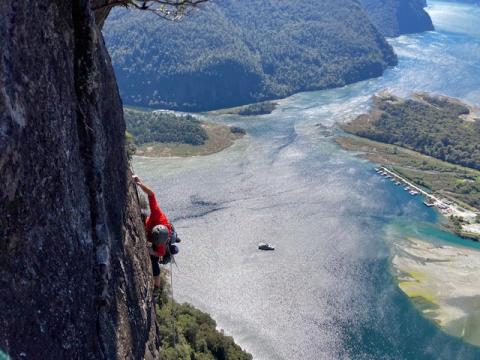
Steve coming to the end of the crux pitch during the first one day free ascent. Creator: Daniel Joll
Comments (0)
There is no comment on this article.
Comments can only be inserted by logged-in user.